

If you’ve ever opened NetDocuments and found a green check mark still sitting next to a document you finished with days ago, you’re not alone. When a document won’t check in, it almost never means what people are afraid it means.
The Good News: Your Work Is Still on Your Computer
When a document doesn’t check back in, it hasn’t disappeared or been eaten by the cloud. The copy you were working on is still sitting on the computer you were using.
That’s the whole reason a check-out exists. NetDocuments gives you a local copy to work on and places a checkmark on the server version so nobody else overwrites it while you have it. Check-in happens when the document closes normally. If it never closed normally, the check mark just never came off.
Why a Document Won’t Check In
Word crashed, the laptop rebooted mid-upload, the VPN dropped, somebody closed the lid at the end of the day — any of those interrupt the hand-off and leave the check mark behind. If it’s happening to you over and over, that’s not bad luck; it’s a configuration problem, and cleaning up the document won’t stop it: see troubleshooting NetDocuments check-in issues for the causes and fix that first. The rest of this post is about cleaning up the documents already stuck.
Find the Document Before You Fix Anything
A document that’s been checked out for an hour is normal. One that’s been checked out for two or three days needs you to do something about it — and if you’re not sure which documents those are, here’s how to find checked out documents in NetDocuments.
Once you’ve got one in front of you, everybody wants to jump straight to checking it off. Don’t. There’s one question you have to answer first — did the document actually change while you had it? — and the only way to answer it honestly is to go look at your local copy.
So find the file first. It’s in one of two places.
Part 1: Find Your Local Copy
Step 1: Look in Your Downloads Folder
Most of the time it’s right here. The fastest way there, on any Windows computer: hold the Windows key and press R, type shell:downloads, and press Enter. That opens your own Downloads folder no matter what your username is.
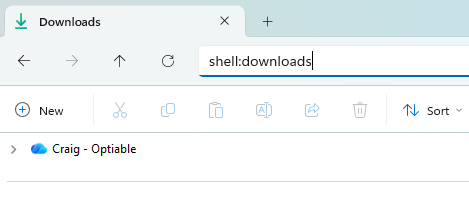
Sort by date modified and look for the file name. Use your eyeballs — if you edited it Tuesday afternoon, the timestamp will say Tuesday afternoon.
Step 2: Look in Your ndOffice Echo Folder
If it isn’t in Downloads, it’s in the Echo folder — the local working folder ndOffice uses. The same trick works here. Hold the Windows key, press R, and paste in:
%USERPROFILE%\ND Office Echo
Open up the folder that says VAULT-########
You will need to look in the root folder or the backup folder.
You can also get there from the ndOffice icon: click the dark blue ndOffice icon in your system tray, then click the gear icon in the lower-left corner, and choose View Echo Folder. That route always leads to the right place, even if your firm has moved the Echo folder somewhere else.
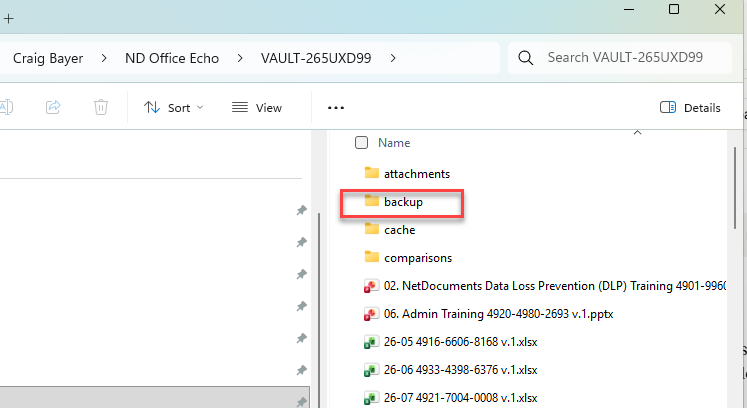
Check the Backup subfolder while you’re in there. That’s where ndOffice keeps recovery copies when a save goes sideways, and it’s saved more than one attorney’s afternoon. I covered the Echo folder in more detail in this post on locating and managing it.
Step 3: Open It and Compare It to the Version in NetDocuments
Open your local copy, open the version in NetDocuments, and compare the two. Are your edits in the NetDocuments version?
This takes thirty seconds, and it’s the step people skip. It’s also the step that decides everything that follows.
Can’t Find It in Either Place?
Then nothing was ever saved locally past the point it opened, which means there’s nothing to recover and nothing was lost — go straight to Option 1 and clear the check mark.
Part 2: Check the Document Back In
Now that you know what you have, this part is two or three clicks.
Option 1: Nothing Changed. Reset It to Checked In.
Find the document in NetDocuments, click the green check mark next to it, and choose Reset to Checked in. That releases the document for everyone else and leaves the version in NetDocuments exactly as it was.
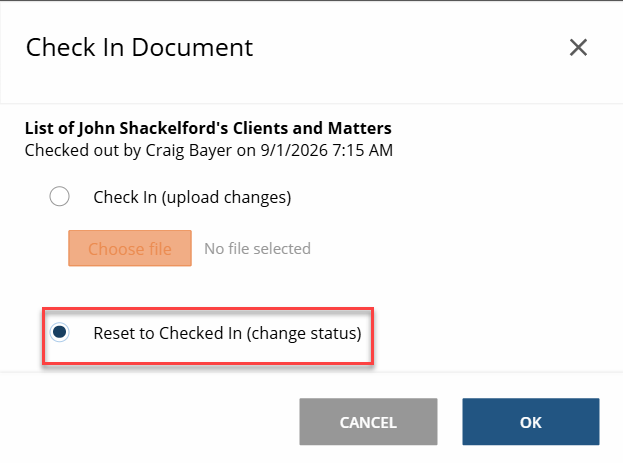
Option 2: You Made Changes. Upload Your Copy as a New Version.
Click the green check mark, choose the option to upload a file, and select the local copy you just confirmed in Part 1. NetDocuments saves it as a new version and releases the check mark.
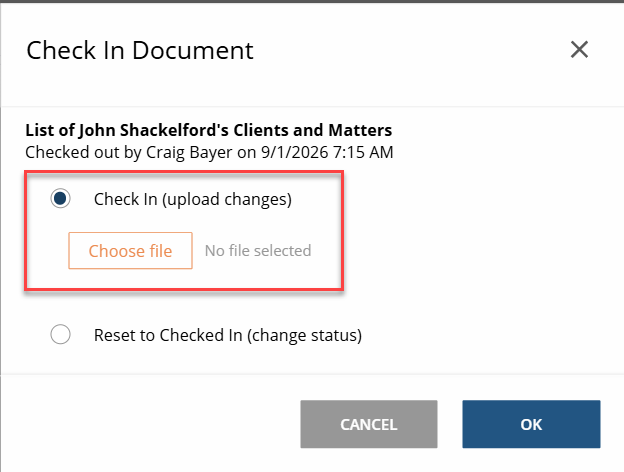
Clearing the check mark on a document you actually edited doesn’t delete the file — it deletes the work. Your edits stay on your hard drive, where no one else in the firm can see them, and that’s how two people end up with two different final versions of the same agreement. When in doubt, upload.
The Result
The document is checked in, your edits are in NetDocuments where the rest of the firm can see them, and the local copy is just a leftover. Nothing to clean up.
Still Checked Out?
If documents keep getting stuck, start with troubleshooting NetDocuments check-in issues — that’s where the actual cause usually is.
And if you have dozens of documents stuck checked out — usually after someone leaves the firm or a laptop gets replaced — clearing them one at a time isn’t the answer. We have tools for checking in documents in bulk, and we can help you figure out why they’re getting stuck in the first place.
Schedule a free consultation at go.oncehub.com/optconsult. I’ve implemented NetDocuments at over 550 law firms since 2010, almost all of them in the 10- to 150-user range.